Monday, June 22, 2009

Colorful...


I'm currently working on the images from Saturday's wedding and ran across this image of a boy at the reception. The reception was held outdoors and many of the guests dressed appropriately for the weather, including this boy. We had a lot of rain the day before and so while we ended up with a beautiful day on Saturday, the humidity and heat was definitely something we had to deal with.

I saw the light coming into the tent that the boy was under and saw a great opportunity, so I took the shot. The colors are natural and not "Photoshopped." It's a "cool" shot, don't you think? And while the shot was cool, for me to stay cool, I drank at least 7 full bottles of bottled water Saturday and sweated it all off!

First Presbyterian Church - Arlington Heights, IL


Over the years, I've photographed several weddings at the First Presbyterian Church in Arlington Heights, IL. These images however, were taken this past Saturday. Like at many churches today, I was asked to take photos only from the back of the church which can make it difficult to get good images at a wedding without the help of high quality telephoto lenses and a good camera. Luckily for me, that's not an issue. I photographed these two ceremony images from the balcony of the church. They came out just fine. Be sure to click on each image for a closer look.

Friday, June 19, 2009

Manfrotto 229 - 3 Way Pan / Tilt Tripod Head

The Manfrotto 229 three-way head is the tripod head that is attached to my trusty Bogen / Manfrotto 3046 tripod. I used this head when making the panorama images seen on my 6-18-09 post. With bubble levels to help guide me, I can be assured that the camera is perfectly level when panning to create the multiple images needed to make a panorama composite image.

Thursday, June 18, 2009

Panorama Images With And Without HDR

The four images used in making the panoramas
(Left to right, Top to bottom)

Standard Panorama

HDR Panorama

Nikon 16mm f2.8 Fisheye Lens - HDR

These images of the atrium at my office were taken while teaching my class on Panoramas. The individual images were stitched together using Photoshop from four images taken with the Nikon D3 camera and a Nikon 24-70mm f2.8 lens on a tripod. For the HDR version, each of the four images had 5 exposures each and were first created with the HDR technique before being stitched together in Photoshop. Essentially, the resulting HDR panorama is a photo using 20 images to make the final image. When all the images were combined, the image measured roughly 37 inches by 7 inches in size! These have been downsized for web use of course.

As a comparison, a Nikon 16mm fisheye lens was used to see how a panorama image stitched together with Photoshop looks against the fisheye. The HDR technique was also utilized. The fisheye doesn't quite cover the full 180 degree view as Nikon claims. It's close, but not exactly 180 degrees. It does show more of the image above and below, but it also makes the distortion of a fisheye lens more noticeable as well. The panoramas do not show the extra top and bottom space, but it does show the full 180 degrees. However, if the fisheye lens version were to have the top and bottom cropped off to similar aspect ratio dimensions as the panoramas, it would look extremely similar to the real panorama images.

Which do you like better? And do you like the HDR version or the standard, "Non-HDR" version better? Be sure to click on each image to get a closer look.

Panorama

I will be teaching Panorama photography today and will post some images later.

We will be taking a series of photos on a tripod and then stitching them together using Photoshop. While it's natural to get some edge to edge distortion using this technique, it's still a very impressive way to create a panorama image. True panorama camera rigs are the best way to create this effect, but unless you shoot panoramas a lot and for a living, it's just too expensive of an option. Besides, this Photoshop method is pretty good and a lot of fun to do.

Check back later for some sample images. I promise you'll be amazed. :)

Sunday, June 14, 2009

Panning


This weekend, I photographed a quick "pick-up" basketball game. It was getting really late in the day and by the time this image was taken, it was already 8:47 PM. With each shot I took, it just kept getting darker and darker as the sun started to disappear.

I kept my Nikon D3 on with continuous exposure using focus tracking and it did a great job even in fairly low light. But since the camera was also set for auto ISO and aperture priority, the shutter speed kept dropping in order to get a decent exposure. By the time this image was taken, I was getting 1/40 second at f2.8 with ISO at 3200. The shot was taken at a focal length of 32mm on the Nikon 24-70mm f2.8 lens.

I kept my camera locked on the player with the ball and followed him as he drove for the shot. Moving the camera to keep up with the subject is known as "panning." Interestingly, only his upper body is focused because everything else in the scene was moving! It makes for a very cool shot, don't you think? The image while blurred, shows action and that's exactly what was going on. Definitely click on the image to see a close up of the image to see the sharpness and blurring.

The D3 was set to shoot at 9 frames per second and with every attempt at a point, I was able to document the game... step by step.

Friday, June 12, 2009

Extreme HDR

Image by Marc Wallace

Here's an image that one of my students photographed and processed using the HDR technique. The image was created with three exposures and shot in RAW format.

Instead of a standard "photo" effect, he went for the extreme. When HDR images are done like this, a "cartoon-like" effect is usually seen, but it works here. The image was then cropped to achieve a panoramic view as well. Colorful, isn't it?!

Nice job Marc! Be sure to click on the image for a closer look.

Sunday, June 07, 2009

Famous Dave's - Vernon Hills IL

Standard JPG Version


HDR Version

And yet another example of the power of an HDR image...

This one was taken in early June just after 7:00 PM. The first image is the standard JPG and the second image is the "enhanced" HDR image which combines only 3 RAW exposures. Be sure to click on each image for a closer look.

Thursday, June 04, 2009

One More HDR Photo Example

Standard Version

HDR Version
(7 exposures combined)

I thought I'd share one more photo from today's HDR training session.

I shot this image of the front of my office building, but I had forgotten to use RAW when taking the photos, so instead, I shot the images in JPG.

The HDR version was a combination of 7 exposures shot in JPG. While RAW is the preferred method for working an HDR image, apparently, it's not all that bad with JPG either!

The standard JPG shot is the comparison of a non-HDR image. Which do you like better? While you might initially think that the HDR photo is darker, it really isn't. Look closely at the trees and you'll see that it's actually a little brighter than the standard photo. But of course, the sky is darker and richer due to the nature of the HDR process.

Again, be sure to click on each image to take a closer look. These were taken with the Nikon D3 camera on a tripod, instead of handheld. For a description of what HDR is all about, see the other post from today.

Photography Class - HDR Photography (High Dynamic Range)

Standard Image

HDR Image
(7 images combined)

Today, while teaching photography, we studied HDR Photography. HDR stands for "High Dynamic Range." Basically, HDR combines several images together to create a single image that can show very bright areas of a photo along with very dark shadow areas of a photo... all in one image.

As you can see, a standard photograph taken normally and based on the reading of the built-in meter of the camera shows the atrium in my office building with all the windows all "blown out" with the sunlight. But the plants look fine. However, even within the plants, the shadow areas are not bright enough to show details.

Now look at the HDR photo. The windows no longer look over-exposed (you can see outside!) and also the plants have enough light that you can see the details inside the formerly shadowed area. Essentially, the range of dark to bright areas are now rendered such that you can see more details in both very bright areas and very dark areas. No additional lighting was used to create this image... what you see is lighting provided by the sunlight outside and any additional lighting is from the flood lights above. Essentially, the same lighting that was used to create the first image above.

So how can the HDR image show so much more detail? Well, this particular HDR image combined 7 different exposures to make the one. However, you can make HDR images with as little as 3 images combined. While a tripod is often helpful to align all the images, I simply handheld the camera for this exercise. Sitll, the image looks pretty good, don't you think? Be sure to click on each image to take a closer look.

How do you make these incredible HDR images? Well, first you sign up for a class with me... and then we learn about...

You get the idea.

Monday, June 01, 2009

AquaTech Rain Shield - Keeping the water out

While my trusty Nikon D3 is basically water resistant, I don't trust it being so. As an added measure for success, I have one of these AquaTech Rain Shields in the event I need to shoot in the rain.

The AquaTech is one of the best rain covers around, but I have no idea if it works or not. I've never had to use it! It's not often a bride is going to want to continue the wedding with downpouring rain happening, but I'm prepared if it does.

The only thing these rain shields do not do is cover the actual lens of the camera. So if water gets on the lens, you'll have "spotty" photos anyway. But at least my camera won't be damaged. The lens' own sunshade extends out beyond the AquaTech and that is supposed to help keep the lens from getting wet. But the moment you tilt the lens towards the sky, all is lost.

You'll see sports photographers shooting with the AquaTech all the time. Regardless of a slight drizzle, the game usually continues. Check out football and baseball games on TV. You'll see the AquaTech in use then...

Thursday, May 28, 2009

What's New??

Well, wedding season is upon us and so things are gearing up for this year's photography.

Again, I'll be shooting with my awesome Nikon D3 along with two Fuji S5 Pro's backing it up. The D3 continues to amaze me with it's high quality resolving power. Couple the Nikon 24-70mm f2.8 lens to it and it does just about anything you want! And for those "long shots" often needed at the ceremony, the 70-200mm f2.8 VR is always ready!

So where are all the wedding photos? Well, I made the decision a while ago to reserve my blog for things other than just weddings to keep the blog fresh and interesting. Sure, I'll post an occasional wedding photo on here, but this blog has gone WAY BEYOND just wedding clients today. Early on, most of my blog viewers were just brides and grooms. No longer. When I check my blog stats, I am getting people from all over the world checking in weekly. And, I get to see what interests them too, and most of it pertains to things like guitars, and photography in general. Lots of photographers check in here and for that, I'm glad.

While my clients still visit my blog, it doesn't seem to be the only thing that draws them to me. That's actually good. Some photographers rely solely on their blog to get them business. By showing only the best photos of the wedding day, they look like "rock stars." But I learned long ago that you need to see a full day's work to know what you are really getting in the end and that's why my clients usually make their decisions to hire me based on seeing my samples in my office as well as meeting with me, not just looking at the blog photos. Half the battle in getting good wedding photography is relating to your photographer and you can't get that from a blog post. Only in direct meetings with your photographer will you really know if you match together. Working with the photographer you like will be the thing that results in quality photographs of the wedding day. I can't emphasize that enough.

In the "slow season" (aka, non-wedding months), I've been filling my time by teaching. In the past, I usually stop teaching during the wedding months, but I don't think I'll be doing that this year. I'm going to continue teaching. While I can't always teach on a Saturday as we approach the summer months, I can still teach on Sundays and also during the weekdays. It seems my help is needed all the time from both new photographers as well as more seasoned photographers and so I've decided to keep going. It's just as exciting to me to teach as it is for my students to learn. So if you or some friends of yours needs some photography or Photoshop help, let me know!

So with all that's happening in the coming months, you'll most likely read and see things that interest me and hopefully will interest you as well during the summer. And as always, feel free to let me know what you'd like to see and read. I appreciate your feedback!

Saturday, May 23, 2009

Window Cleaning


Can you do this?

While these guys were not particularly that high up when I took this photo, they were just moments before. My office building has 10 floors to it, so this has got to be relatively "easy" for them. (It would be totally "hard" for me!) But can you imagine having to do a huge high-rise building downtown? No way! I could never do this. Can you? No scaffolds for these guys... they just hang off the building with ropes! Be sure to click on each photo for a closer look. (Edit note: To see how tall this building actually is, see the photo from the June 4, 2009 post above.)

Monday, May 18, 2009

Frog Test


My aunt sent this test to me recently... do not click on the picture above, Click Here instead after reading this entire post.

This is said to be a second grade computer test given in China. You are supposed to switch the frogs to the opposite side in 2 minutes or less. You can move frogs one at a time or jump over one frog at a time.

Can you do it? Give it a try and time yourself and then post your time in the comments section of this post. If you can't do it and need the solution, click on the comments section and you can read the solution I've posted there.

Good luck!

Thursday, May 14, 2009

How Is The Economy Affecting Wedding Photography?

I get asked this question a lot lately.

Well, like any other business, the economy is definitely affecting the wedding industry and wedding photographers. While it may be true that people will still get married even in a lousy economy, it is also true that people are more careful in how they spend their money for their weddings. Budgets are tightening up!

It's not unusual to hear potential clients say, "I'll sacrifice unnecessary items for my wedding, but I still want the best photography I can get." That's most likely because they know that after everything is over and done with, the photos are one of the only things they will have to remember how their day went. Years from now, they can turn back to the photos to re-live the day.

Today, wedding couples are looking for a good photographer, but also they are looking for a good deal. I can't say that I blame them. Times are tight for everyone and you want the best you can get for your money.

There are two ways to save on your wedding photography. You can hire a less experienced wedding photographer who often will photograph weddings for less... or you can hire a seasoned professional wedding photographer and ask for a more modest package.

For my business, I'm finding that clients coming in today are asking for the more modest packages. While I do still get people coming in and booking higher priced packages, it is not as common as it was even just a year ago. This is how the economy is affecting my business. To make the same income this year, I have to photograph more weddings to make up for the loss of income due to smaller packages. That's ok. We all have to do what we have to do to make a living. I'm just glad people are still willing to hire experienced photographers and get smaller packages rather than going the route of hiring inexperienced photographers just to save a buck.

Still, there are those whom I have been in contact with who have told me that even my least expensive package is more than they are willing to spend and then they seek out the photographers in the lower price ranges. Their photography budgets? Under $500. That's really a shock. I always wonder if they have ever done a little math before asking if a professional photographer can help do their wedding for under $500. Even if the photographer were to photograph one wedding every weekend of the year, his annual income would only be $26,000 gross. That doesn't include taxes taken out or operating expenses. Think about that... can a pro do this full time if he only charges $500 per wedding?

My suggestion about how to be smart with your wedding budget is to cut back on items that may not be as necessary rather than sacrifice your wedding photography itself. Don't order the most expensive album or the largest album if your budget can't handle it. Hire the experienced photographer, but perhaps ask for less hours of coverage, or perhaps get a smaller album. And if the budget is really tight, just hold off on the album until next year. The key is to get the images taken correctly in the first place. Then after the wedding, you may find that you have some wedding gift money which could help pay for an album or a larger album. Book the right photographer first... don't skimp and hire the inexperienced photographer just to save a buck. Often, it's just not worth taking that chance.

Wednesday, May 13, 2009

Nikon FE - Years of Wedding Use


This Nikon FE camera has worked a lot of weddings! It's my wife's camera really, but after getting married, I took it from her.

When I first started photographing weddings in 1990, this was the camera I used. It's a camera capable of shutter speed priority, but I usually used it on manual mode. Really, a Nikon FM would have probably been better for wedding use as the FM allows for Aperture Priority. But it really didn't matter. Manual shooting was the norm for me back then and using a Nikon FE along with my trusty Minolta light meter, I was fully capable of taking care of business.

Today, the Nikon FE doesn't see any action. I haven't shot a single frame of film in many years since going to digital. And, like my old Canon AE-1 Program, this camera weighs "nothing" compared to my current Nikon D3.

By the way, the Nikon FE still works perfectly!

While I used the Nikon FE for weddings, I used a Nikon FM2 for my work in law enforcement. I had a power-winder on my FM2 which also helped me in holding the camera as well. Today's cameras have "built-in" grips which make holding cameras a lot easier. But older cameras like the FE and FM2 do not have any grips and you can easily drop the camera if you are not careful.

I used this Nikon FE with a Stroboframe R7 flash bracket along with a Sunpak 622 flash. Together, it was a monster of a rig. While my current camera is pretty heavy, it is more compact than my older rig with that Stroboframe bracket. Today's photographers often go without a flash bracket, but for me, a bracket is nice to have to keep shadows behind the subject. It's a nicer look in my opinion.

Sunday, May 10, 2009

Play It Again... The Fairlanes Reunion


The Fairlanes have been playing together since 1979. Over the years, there have been various band member changes... but on Saturday, May 9, 2009, several of the past members joined with current members to play at Bogies Ale House restaurant in Mount Prospect.

I had photographed The Fairlanes back in March (see my March 22, 2009 post) but always felt that I could have done better. The lighting was extremely dark at Gino's East that evening and I could not move around too easily there. So when I found out that The Fairlanes would be providing their own lighting for this reunion gig, I promised them and myself that I would photograph them again.

As before, the band did a wonderful job playing songs from the 50's to the 80's. But having some of their past bandmates join in really made it special.

Bogies restaurant is actually a converted barn. The silo is still next to the building too! The restaurant was formerly called The Loft, but in recent years, the restaurant went through some major renovations and the name was changed to Bogies. It's a nice venue.

To see more photos from the reunion gig, click here and to go the Events section. There is a slideshow function on the site which you can activate by clicking on "View Catagory Slideshow" located in the upper right side of the page.

Thursday, May 07, 2009

My First "Good" Camera


In the early 1980's I bought a Canon AE-1 Program camera to take on a trip to Hawaii.

The AE-1 Program was one of the first cameras (if not the first) to offer a "program" mode. Essentially, the camera made the decision as to what the photo should look like. While this was an innovative feature, I found myself wanting more.

The AE-1 Program could also shoot in shutter speed priority mode. I get to choose the shutter speed and the camera would choose the aperture of the lens. This is great for sports shooting where you might want to decide how fast the shutter speed needs to be to stop the action. But trying to do anything where you determined the depth of field, you could not do it automatically. It lacked the aperture priority capabilities. So to shoot where I could determine the depth of field in a shot, I had to do it manually.

My AE-1 Program camera still works. It's a great 35mm film camera. But I don't shoot film today, so it just sits around looking pretty. By the way, this camera barely weighs anything. Comparing its heft to my Nikon D3, the D3 weighs like a heavy brick!

Wednesday, May 06, 2009

San Diego Chicken Pie Shop


(Images "borrowed" from my daughter)

Alright... I'm on a roll... so here's another restaurant for you!

The San Diego Chicken Pie Shop is another real treat. This restaurant originally opened in 1936.  I recall going to this restaurant many times with my wife when we lived in San Diego in the late 1980's! While there are other things to order at this restaurant, we always ordered the Pie Dinner.

This is nothing fancy. It's basically just a pot pie with gravy on it and you get mashed potatos, a roll with butter, mixed vegatables (peas, corn and carrots), coleslaw and a slice of pie or a scoop of vanilla ice cream for dessert. And all this is very reasonably priced as well. Some people can't stand this place. But for me, it's great. Basic food. It's almost like food you can get just out of your own freezer, microwave it and eat it. But the Chicken Pot Pies are freshly made and so much better than that.

There are mixed reviews on this one compared to The Green Fly, but if you aren't a fussy eater and you want something that reminds you of the 50's... try this place in San Diego!

Back when I lived in San Diego (in the late 1980's...) the price for a Pie Dinner was around $3.65. Now in 2016 it's $8.99.  (I updated this post with my daughter's photos in 2016... originally wrote it in 2009). Still a great deal in my opinion!

My daughter said that it was nothing fancy, but she loved it as well.  Not sure her friend was as impressed though.  But, if you like simple, basic homestyle food, you can't beat the San Diego Chicken Pie Shop!

Tuesday, May 05, 2009

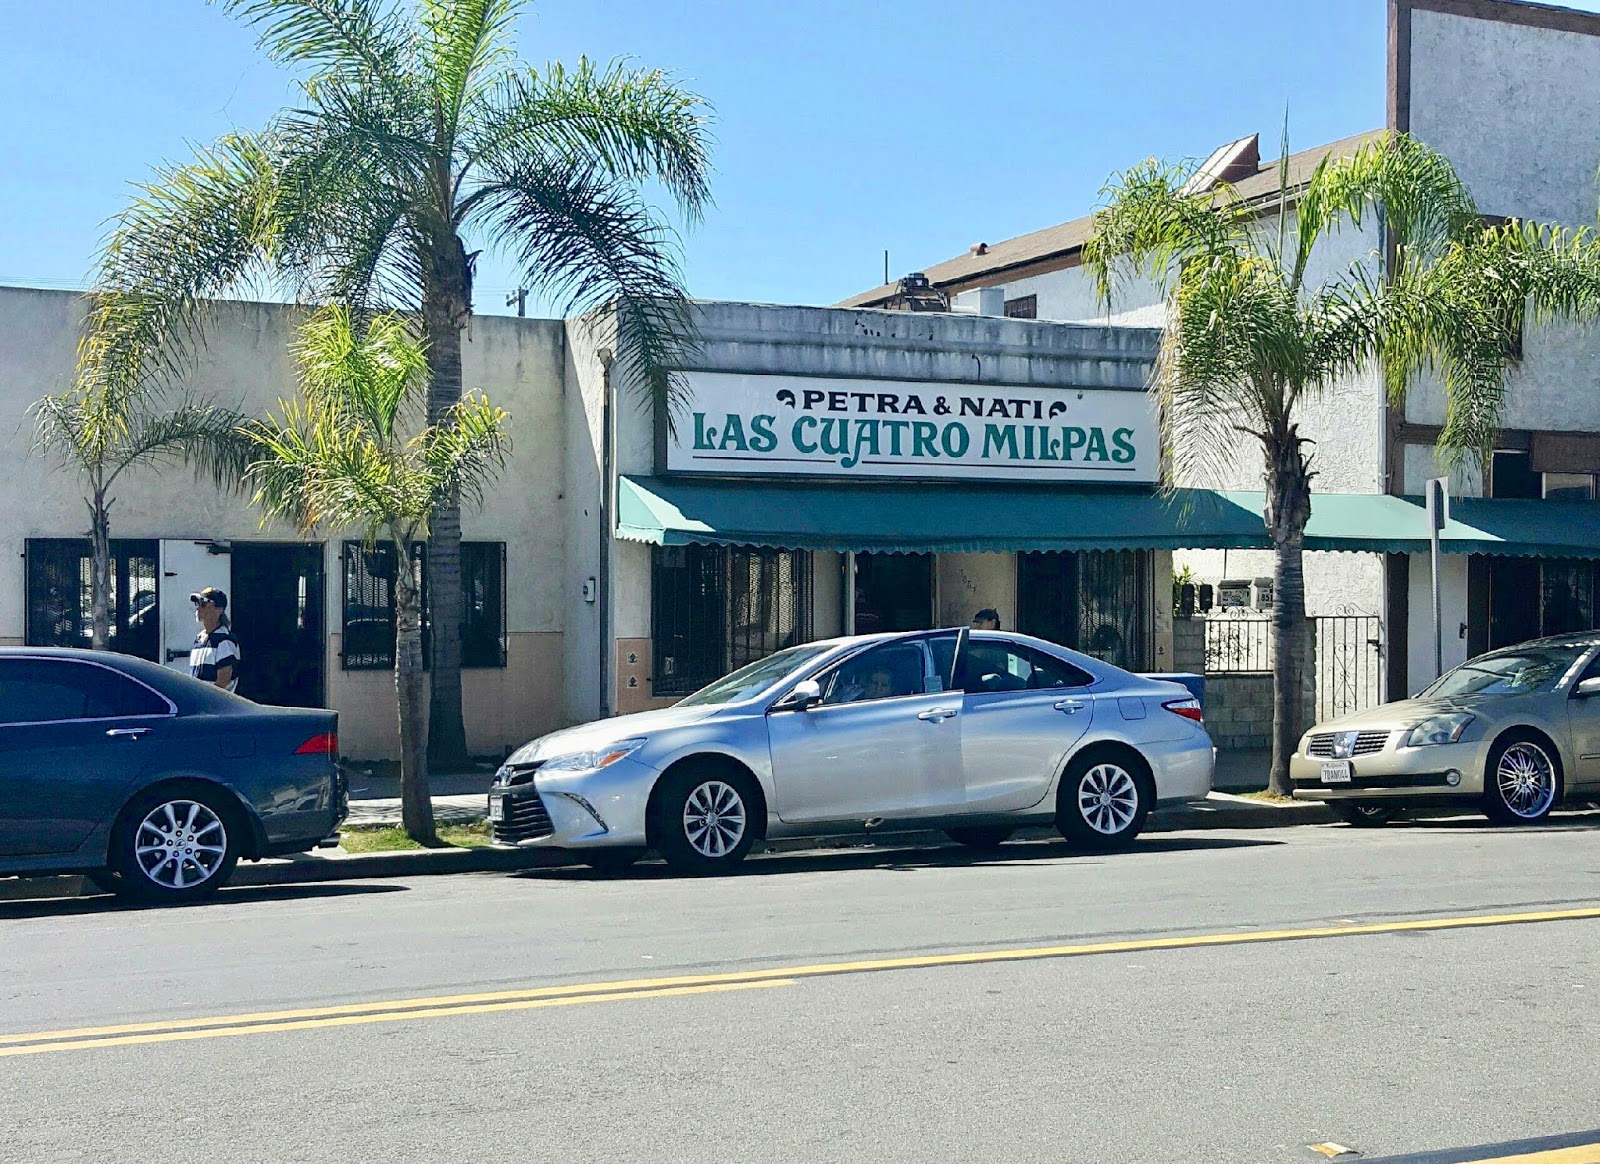
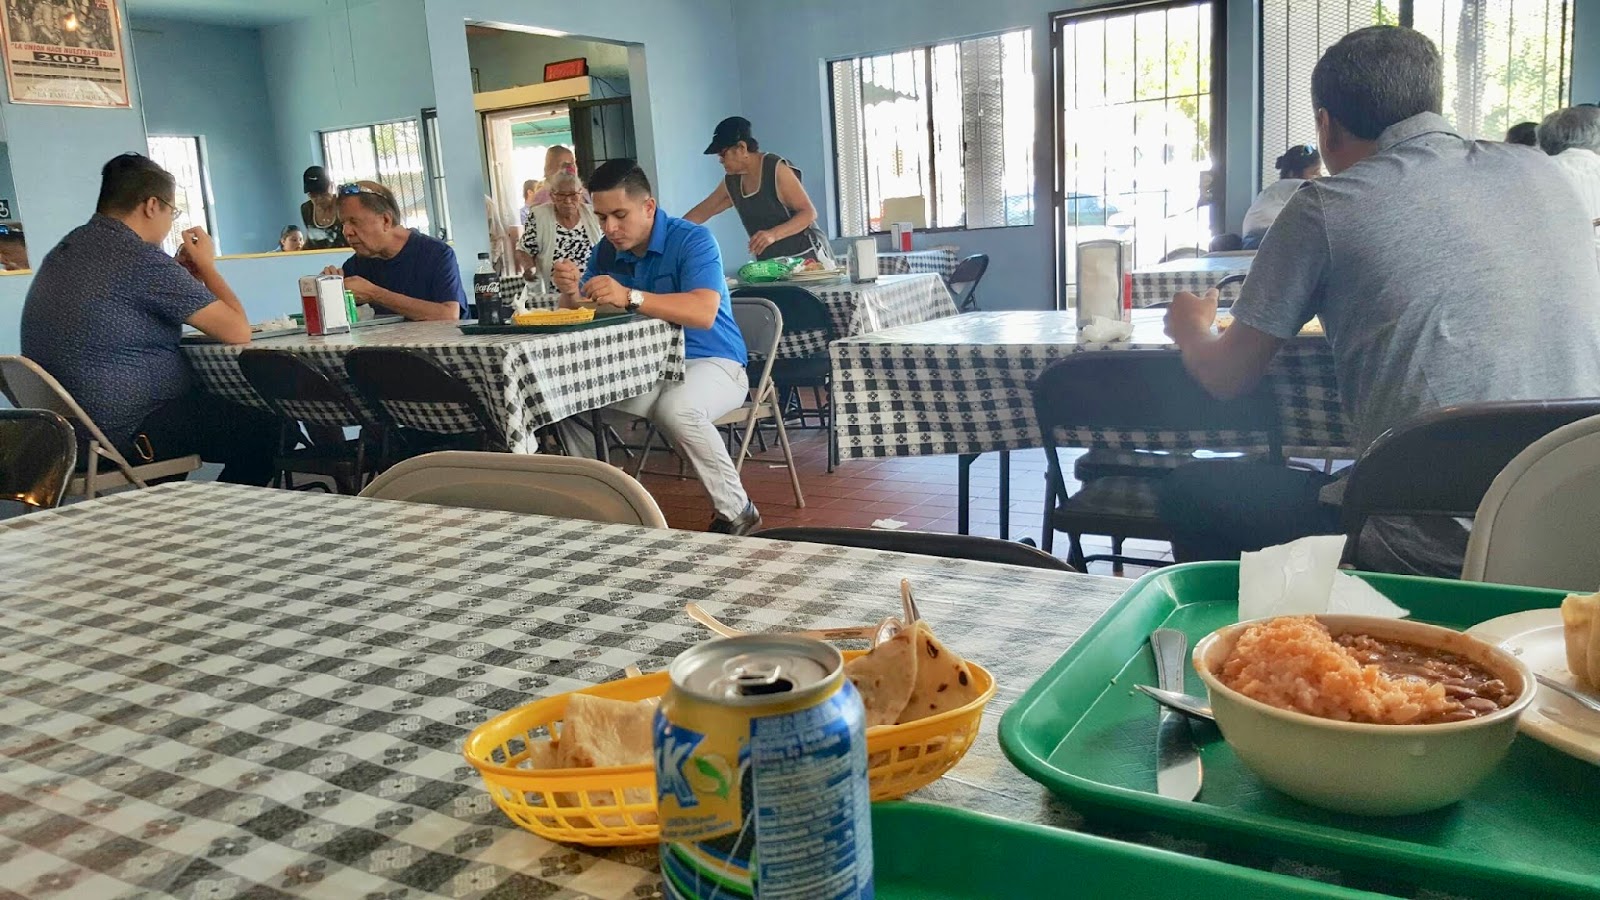
The Green Fly - Las Cuatro Milpas - San Diego

(All Images "borrowed" from the Internet)


(All images "borrowed" from the internet)

I just had to post this one and I can't wait until Thursday.

When I think of authentic Mexican food, the first place I think of is Las Cuatro Milpas in Barrio Logan in San Diego. This place is affectionately known to local law enforcement diners as "The Green Fly."

I was working at the San Diego Police Department back in the early 1990's and my supervisor, Gary Avery, took me to "The Green Fly" for lunch. With a name like "The Green Fly," you can't just let that go without asking, "Why do they call it The Green Fly?" Well, it's not really named that... it's a nickname that local law enforcement personnel call it. If I remember the story correctly, there used to be these huge green colored flies that hung around the restaurant and the nickname just stuck. It's not too appetizing of a nickname for a restaurant, don't you think?

Well, I have to tell you, this place is a definite "hole-in-the-wall" if I've ever seen one. Totally not what I would have thought to be a good restaurant. You can see in the photos I've "borrowed" from the web that the decoration there is non-existant. Not only that, you can see the kitchen when you are ordering your food because it's right out in the open! You have to wonder how this place can still be in business without being shut down for some kind of health code violation!

So having said all this, you would think this is probably the worst restaurant around right? WRONG! If you want totally authentic Mexican food at a ridiculously low price... this is the place to go! There is always a huge line of people waiting to get in. Why? Because the food is THAT GOOD and so is the price. I always thought that this is probably the safest place to have lunch because it seems every law enforcement agency is represented there for lunch! Police officiers, detectives, DA investigators, FBI, Sheriffs Deputies, CHP officers, you name it, they are there!

I had an email exchange with one of my friends from the San Diego Police Department this evening and this place just popped back in my mind. I could not remember the real name of this restaurant so I simply typed into Google a search for The Green Fly San Diego and the restaurant was found! Yes, even Google knows it's called The Green Fly! Do your own search for Las Cuatro Milpas San Diego and read all the wonderful reviews of this place. Very few people give it less than 4 or 5 stars out of 5 and that's so surprising considering the look of this place. But it's been around since the 1930's... so something has to be right about it!

If you are ever in San Diego go here for lunch. Get there early because you don't want to get stuck in the long line! Everything is good there, but I particularly like the buritos. Now I'm getting hungry!

My daughter went here with her friend in 2016.  They both loved it!  My daughter had heard me talking about this place all her life, so she just had to go.

For more great San Diego food, check out my post on the San Diego Chicken Pie Shop!

Here's my daughter's photos from 2016:


I've Been Really Tied Up These Past Few Days

Sorry to everyone who checked my blog for a post this past Monday and found nothing.

I've been extremely tied up working on the details of something and unfortunately can't share that here just yet. But it's a good thing and once I get the approval to share it, I will. Suffice it to say, it's something I'm going to really enjoy (I love my job!) and it will take me back to a place I been longing to be at for a long time.

Check back on Thursday for the next blog post. I promise to have something to post that day!